
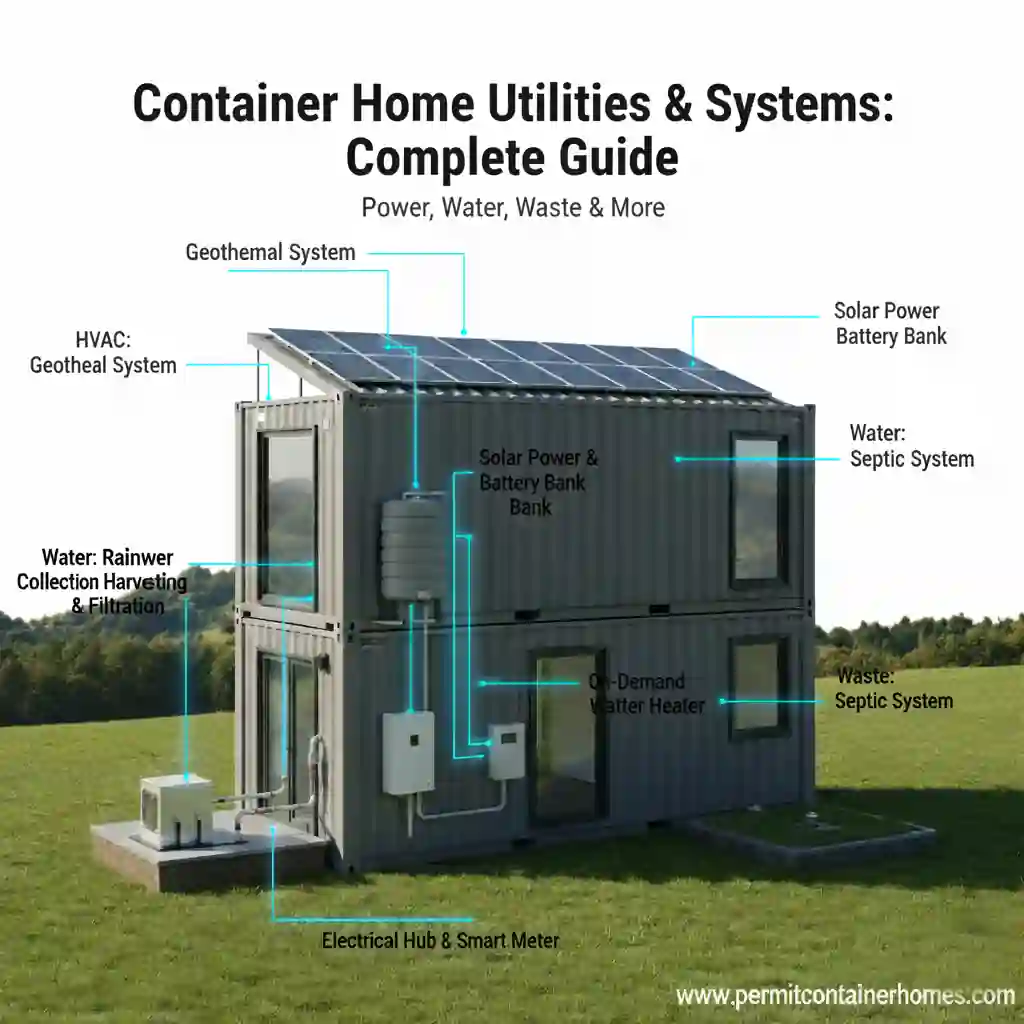
Container Home Utilities & Systems: Complete 2025 Guide to Plumbing, Electrical, HVAC & Off-Grid
Professional specifications, code compliance requirements, cost analysis, and installation guidance for all major utility systems in USA shipping container homes
Why Utilities & Systems Planning Is Critical for Container Homes
Proper utilities and systems installation determines the livability, functionality, safety, and long-term performance of your container home. Unlike traditional construction where utility rough-ins occur during framing, shipping container homes require careful planning to integrate plumbing, electrical, HVAC, water, and sewer systems within confined spaces and through corrugated steel walls. This comprehensive 2025 guide provides detailed specifications, code compliance requirements, cost analysis, and professional installation recommendations for all major utility systems in container homes.
🗺️ Utilities Planning Overview & System Integration
Successful utility installation in container homes begins with comprehensive planning during the design phase—ideally before purchasing containers. Unlike wood-frame construction where studs provide natural utility chases, shipping containers have corrugated steel walls and limited interior space, requiring creative routing solutions and careful coordination between systems.
The most common utility routing strategies for container homes include running lines through the floor cavity (requiring elevated foundation systems), above the ceiling in a dropped soffit or false ceiling, through interior partition walls when available, or externally with weatherproof protection. Each approach has trade-offs regarding cost, installation complexity, maintenance access, and interior space impact.
🔑 Key Planning Considerations for Container Home Utilities
Early Coordination
Plan utility layouts during design phase before cutting container openings or installing insulation. This prevents costly retrofits and ensures optimal system routing.
Space Constraints
Container walls are typically 6-8 inches wide—insufficient for standard plumbing stacks or electrical panels. Creative solutions like chase walls and floor cavities are often needed.
Steel Penetrations
Every hole through steel walls requires proper sealing, flashing, and corrosion protection to maintain structural integrity and prevent leaks.
Code Compliance
All systems must meet NEC 2020, IPC 2021, IMC 2021, and local amendments. Proper documentation supports smooth permit approval.
Inspection Access
Design utility chases with removable access panels for future maintenance and inspections—required by most building departments.
Multi-Container Coordination
Plan utility connections between containers during initial layout—retrofitting connections later is significantly more expensive.
💡 Professional Recommendation
Professional mechanical, electrical, and plumbing (MEP) engineering is highly recommended for container homes, especially for complex multi-container designs. Licensed engineers create detailed utility plans showing routing, sizing, materials, and code compliance documentation that can help facilitate permit approval.
🚰 Plumbing Systems: Water Supply & Drainage
Plumbing installation in container homes presents unique challenges due to confined spaces, steel walls, and the need to maintain structural integrity while penetrating the container envelope. Most container home builders utilize PEX (cross-linked polyethylene) for water supply lines due to its flexibility, freeze resistance, and ease of installation through tight spaces.
Water Supply System Design (IPC 2021 Chapter 6)
Container home water supply systems should comply with IPC Chapter 6 requirements for sizing, materials, and installation. PEX tubing (typically ½” for branches, ¾” for mains) offers significant advantages over rigid copper or CPVC in container applications.
Recommended Water Supply Materials
- PEX Tubing: PEX-A or PEX-B rated for potable water, UV-protected for exposed runs, color-coded (red=hot, blue=cold)
- Manifold Systems: Home-run manifolds centralize distribution, reduce fittings, enable individual fixture shutoffs
- Insulation: All water lines require insulation in unconditioned spaces (R-3 minimum per IPC 607.2)
- Shut-off Valves: Install accessible shut-offs at each fixture and zone for maintenance
- Expansion Protection: Use expansion loops or flexible connectors to accommodate thermal expansion/contraction
Drainage, Waste & Vent (DWV) Systems (IPC 2021 Chapter 7-9)
DWV systems present the biggest challenge in container homes due to pipe sizing requirements and slope specifications. ABS or PVC drain pipes (minimum 1½” for sinks, 2″ for showers, 3″ or 4″ for toilets and main drains) require more space than water supply lines.
DWV Installation Strategies
- Floor Cavity Routing: Requires raised floor system or elevated pier foundation with 18″+ clearance
- Wet Wall Construction: Build thickened interior walls (6-8″ deep) adjacent to bathrooms and kitchens for vertical stacks
- Venting Solutions: Use air admittance valves (AAVs) where permitted, or route vent stacks through roof penetrations
- Slope Requirements: Maintain ¼” per foot slope minimum for drainage per IPC 704.1
- Clean-outs: Install accessible clean-outs every 100′ of horizontal run and at direction changes per IPC 708
Plumbing Fixtures & Rough-In Specifications
| Fixture Type | Supply Size | Drain Size | Rough-In Height | Avg Cost (Fixture + Install) |
|---|---|---|---|---|
| Kitchen Sink | ½” hot/cold | 1½” drain | 21″ centerline | $400 – $800 |
| Bathroom Vanity | ½” hot/cold | 1¼” drain | 21″ centerline | $350 – $700 |
| Toilet | ⅜” cold supply | 3″ or 4″ drain | 12″ rough-in from wall | $500 – $1,000 |
| Shower/Tub | ½” hot/cold | 2″ drain | 48″ valve height | $800 – $2,000 |
| Washing Machine | ½” hot/cold | 2″ standpipe | 42″ standpipe height | $300 – $600 |
Water Heater Selection for Container Homes
Tankless (on-demand) water heaters are popular in container homes due to space efficiency and energy savings. Electric tankless units require 120-200 amp electrical service and dedicated 240V circuits. Gas tankless units require proper venting through exterior walls and combustion air supply.
Tankless vs. Tank Water Heaters
Tankless: Cost $800-$1,500 installed, save floor space, provide endless hot water, 20+ year lifespan
Tank (30-40 gal): Cost $400-$800 installed, require 2-3 sq ft floor space, 10-15 year lifespan, limited recovery rate for multiple fixtures
⚡ Electrical Systems & Power Distribution
Electrical systems in container homes should comply with NEC 2020 (National Electrical Code) requirements while addressing unique challenges posed by all-metal structures. Metal containers require special attention to grounding, bonding, and conductor protection to help ensure safety and code compliance.
Electrical Service & Panel Requirements (NEC Article 230)
Most container homes require 100-200 amp electrical service depending on size and appliances. Single-container studios typically need 100 amp service, while multi-container homes with electric heating, air conditioning, and modern appliances require 200 amp service. The main electrical panel should be located in an accessible interior location, protected from weather exposure.
Electrical Panel Sizing by Home Size
| Container Configuration | Square Footage | Recommended Service | Panel Type | Installation Cost |
|---|---|---|---|---|
| Single 20′ Container | 160 sq ft | 60-100 amp | 12-16 circuit panel | $1,200 – $2,000 |
| Single 40′ Container | 320 sq ft | 100 amp | 20-24 circuit panel | $1,500 – $2,500 |
| Multi-Container (2-4 units) | 640-1,280 sq ft | 150-200 amp | 30-40 circuit panel | $2,500 – $4,500 |
| Large Multi-Container | 1,500+ sq ft | 200+ amp | 40+ circuit panel | $3,500 – $6,000 |
Grounding & Bonding Requirements for Metal Containers
Container homes require special grounding considerations since the entire structure is metal. Per NEC Article 250, the container structure should be bonded to the electrical system ground. All metal components including the container frame, doors, windows, and exposed metal surfaces should be electrically bonded together and connected to the grounding electrode system.
Container-Specific Electrical Requirements
- Structure Bonding: Connect container frame to electrical ground with #6 AWG copper conductor minimum
- GFCI Protection: All outlets within 6 feet of water sources require GFCI protection per NEC 210.8
- AFCI Protection: Bedroom circuits require arc-fault circuit interrupter protection per NEC 210.12
- Conductor Protection: All wiring through metal walls requires conduit or armored cable (MC cable)
- Weatherproof Boxes: Any exterior electrical boxes require weatherproof covers rated NEMA 3R or higher
- Penetration Sealing: All electrical penetrations through container walls require proper sealing and weatherproofing
Wiring Methods for Container Homes
Wiring installation in container homes typically uses Romex (NM cable) for interior walls and conduit or armored cable (MC cable) when running through or along metal surfaces. Most builders create interior stud walls specifically to house electrical wiring, avoiding the need for extensive metal penetrations.
| Wiring Type | Best For | Pros | Cons | Cost/Foot |
|---|---|---|---|---|
| Romex (NM Cable) | Interior partition walls, concealed runs | Lowest cost, easy installation, familiar to electricians | Cannot be exposed on metal surfaces, requires protection | $0.40-$0.60 |
| MC Cable (Armored) | Runs along metal surfaces, exposed locations | Protects conductors, allowed on metal, durable | Higher cost, more difficult to install | $1.20-$1.80 |
| EMT Conduit | Commercial installations, maximum protection | Maximum protection, future wire changes possible | Highest cost, labor-intensive installation | $2.00-$3.50 |
Outlet & Lighting Requirements
Container homes should meet NEC spacing requirements for outlets and lighting. Receptacles should be installed so that no point along the wall is more than 6 feet from an outlet (NEC 210.52). Kitchens require outlets every 4 feet along countertops. Bathrooms require at least one GFCI-protected outlet near the sink.
🌡️ HVAC Systems: Heating, Cooling & Ventilation
HVAC system selection for container homes requires careful consideration of the unique thermal properties of metal structures. Containers have minimal thermal mass, high thermal conductivity, and limited insulation space, making them susceptible to rapid temperature changes. Proper HVAC sizing and insulation are important for energy efficiency and comfort.
HVAC System Options for Container Homes
Most container homes utilize mini-split heat pumps due to their efficiency, flexibility, and ease of installation. These ductless systems require only a small penetration through the container wall for refrigerant lines, avoiding the space requirements of traditional ducted systems.
Mini-Split Heat Pump Systems
Mini-split systems consist of an outdoor compressor unit connected to one or more indoor air handlers via refrigerant lines. These systems provide both heating and cooling with high efficiency (SEER 16-25, HSPF 8-12). Installation requires only a 3-inch wall penetration for line sets.
| Home Size | BTU Capacity Needed | System Configuration | SEER Rating | Installation Cost |
|---|---|---|---|---|
| 160-320 sq ft (1 container) | 9,000-12,000 BTU | Single-zone mini-split | 18-22 SEER | $2,500 – $4,000 |
| 640-960 sq ft (2-3 containers) | 18,000-24,000 BTU | Dual-zone mini-split | 18-22 SEER | $4,500 – $7,000 |
| 1,280+ sq ft (4+ containers) | 30,000-48,000 BTU | Multi-zone (3-5 zones) | 16-20 SEER | $7,000 – $12,000 |
Alternative Heating & Cooling Options
- Window AC Units: Budget option for cooling only ($300-$800 per unit), less efficient, visible from exterior
- Portable AC/Heaters: Temporary solution, less efficient, requires window venting ($400-$1,200)
- Radiant Floor Heating: Excellent comfort, requires slab foundation, high installation cost ($8-$15/sq ft)
- Wood Stoves: Off-grid heating option, requires proper venting and clearances, fire inspection required ($2,000-$5,000 installed)
- Propane Heaters: Off-grid option, requires ventilation and safety equipment, propane tank installation ($1,500-$3,500)
Ventilation Requirements (IMC 2021)
Container homes require mechanical ventilation to meet IMC (International Mechanical Code) 2021 requirements and help prevent moisture buildup. Metal containers can be prone to condensation issues without proper ventilation, potentially causing mold, rust, and insulation degradation.
Recommended Ventilation Rates
- Whole-House Ventilation: 0.03 CFM per square foot continuous or 0.06 CFM intermittent (IMC 403.3)
- Kitchen Exhaust: 100 CFM intermittent or 25 CFM continuous range hood required
- Bathroom Exhaust: 50 CFM intermittent or 20 CFM continuous exhaust fan required per bathroom
- Air Changes: Minimum 0.35 air changes per hour for residential occupancy
Ductwork Considerations
Traditional ducted HVAC systems can be challenging in container homes due to limited ceiling height and wall cavity space. When ductwork is necessary, use the space above dropped ceilings, under raised floors, or through chase walls. Ductwork requires insulation (R-6 minimum in unconditioned spaces) and proper sealing to help prevent energy loss.
🔑 HVAC Efficiency Tips for Container Homes
- Insulation First: Install minimum R-13 wall and R-30 ceiling insulation before sizing HVAC equipment
- Thermal Breaks: Use thermal break materials at metal connections to reduce heat transfer
- Window Selection: Low-E double or triple-pane windows reduce heating/cooling loads significantly
- Orientation: Orient containers with long axis east-west to minimize summer heat gain
- Shading: Install awnings, overhangs, or exterior shades on south-facing windows
- Air Sealing: Seal all penetrations, joints, and seams to help prevent air infiltration
💧 Water Systems: Wells, Municipal & Rainwater
Container homes can connect to municipal water systems, private wells, or utilize rainwater collection systems depending on location and local regulations. Water system selection impacts costs, maintenance requirements, and off-grid capability.
Municipal Water Connection
Connecting to municipal water provides reliable, treated water supply with minimal maintenance. Connection requires permit application, tap fees, meter installation, and trenching from the main line to your container home. Municipal water costs include connection fees ($1,500-$5,000), monthly service charges ($30-$100), and usage fees ($3-$8 per 1,000 gallons).
Well Water Systems
Private wells offer independence from municipal systems but require higher upfront investment and ongoing maintenance. Well installation costs $5,000-$15,000 depending on depth, geology, and flow rate. Wells require pump systems, pressure tanks, water treatment equipment, and regular testing.
Well System Components & Costs
| Component | Description | Typical Specifications | Cost Range |
|---|---|---|---|
| Well Drilling | Drill well to aquifer depth | 100-400 feet typical | $3,000 – $10,000 |
| Submersible Pump | Pump water from well to house | ½ to 1 HP, 10-15 GPM | $800 – $2,000 |
| Pressure Tank | Maintains system pressure | 40-80 gallon capacity | $400 – $800 |
| Water Treatment | Filtration, softening, UV | Based on water quality test | $1,000 – $4,000 |
| Installation & Permits | Professional installation | Licensed well driller required | $1,500 – $3,000 |
Rainwater Harvesting Systems
Rainwater collection provides supplemental or primary water supply in areas with adequate rainfall. Container roofs make excellent catchment surfaces—a 40′ container (320 sq ft roof) collects approximately 200 gallons per inch of rainfall. Basic rainwater systems cost $2,000-$5,000 for collection, storage, and filtration equipment.
🚽 Sewer & Septic Systems
Wastewater disposal systems for container homes include municipal sewer connections, septic systems, or alternative treatment systems. System selection depends on location, soil conditions, local regulations, and budget.
Municipal Sewer Connection
Municipal sewer provides convenient wastewater disposal with minimal maintenance. Connection requires sewer tap permit ($500-$2,500), installation of sewer lateral from main to house ($2,000-$5,000), and ongoing monthly sewer fees ($30-$80). Total connection costs typically range from $3,000 to $8,000.
Septic System Installation
Septic systems treat wastewater on-site using underground tanks and drain fields. Standard septic systems cost $5,000-$15,000 installed depending on soil conditions, system size, and local requirements. Septic systems require percolation testing, health department approval, and professional installation.
Septic System Sizing by Home Size
- 1-2 Bedroom (Single Container): 750-1,000 gallon tank, 250-300 sq ft drain field, cost $5,000-$8,000
- 3-4 Bedroom (Multi-Container): 1,000-1,250 gallon tank, 400-500 sq ft drain field, cost $8,000-$12,000
- 5+ Bedroom (Large Home): 1,250-1,500 gallon tank, 600+ sq ft drain field, cost $12,000-$18,000
Alternative Wastewater Systems
Alternative systems suit challenging sites with poor soil drainage, high water tables, or limited space. Options include mound systems ($15,000-$25,000), aerobic treatment units ($10,000-$15,000), and composting toilets with greywater systems ($3,000-$6,000). Check local regulations—many jurisdictions have specific requirements for alternative systems.
☀️ Solar Power & Off-Grid Systems
Solar power systems enable container homes to reduce utility costs or achieve energy independence. Container roofs provide excellent mounting surfaces for solar panels—a 40′ container accommodates 8-12 panels (2.5-4 kW system), often sufficient for single-container homes with efficient appliances.
Grid-Tied Solar Systems
Grid-tied systems connect to utility power, using solar during the day and drawing from the grid at night. Excess solar production may credit your utility account through net metering. Grid-tied systems cost $2.50-$3.50 per watt installed—a typical 5 kW system costs $12,500-$17,500 before incentives. Federal tax credits may reduce costs by 30%.
Off-Grid Solar Systems
Off-grid systems include battery storage for energy independence. Complete off-grid systems cost $15,000-$40,000 depending on capacity, battery type, and backup generator requirements. Off-grid systems require careful energy management and typically 50% larger solar arrays than grid-tied systems.
Off-Grid System Components
| Component | Function | Typical Specifications | Cost Range |
|---|---|---|---|
| Solar Panels | Generate DC electricity | 5-10 kW array (15-30 panels) | $7,500 – $15,000 |
| Battery Bank | Store energy for nighttime use | 10-20 kWh lithium or lead-acid | $5,000 – $15,000 |
| Inverter/Charger | Convert DC to AC power | 4-8 kW continuous capacity | $2,000 – $5,000 |
| Charge Controller | Regulate charging from panels | MPPT type, 60-100 amp | $500 – $1,500 |
| Backup Generator | Charge batteries during cloudy periods | 5-10 kW propane or diesel | $2,000 – $6,000 |
Energy Efficiency for Off-Grid Living
Off-grid container homes benefit from aggressive energy efficiency to help minimize solar system costs. LED lighting, Energy Star appliances, propane cooking/heating, and DC appliances can dramatically reduce electrical loads. Target 10-20 kWh daily consumption for comfortable off-grid living in a single-container home.
💰 Complete Utilities Cost Analysis
Total utility installation costs for container homes typically range from $15,000 to $35,000 depending on home size, system complexity, site conditions, and whether connecting to municipal services or installing independent systems. The following table provides comprehensive cost breakdowns for different container home configurations.
| System | Single Container (320 sq ft) | Multi-Container (960 sq ft) | Large Home (1,500+ sq ft) |
|---|---|---|---|
| Plumbing (fixtures, water heater, rough-in) | $2,500 – $4,500 | $5,000 – $10,000 | $8,000 – $15,000 |
| Electrical (panel, wiring, outlets, fixtures) | $2,000 – $4,000 | $4,500 – $8,000 | $7,000 – $12,000 |
| HVAC (mini-split or equivalent) | $2,500 – $4,000 | $5,000 – $8,000 | $7,000 – $12,000 |
| Water Connection (municipal or well) | $1,500 – $8,000 | $2,000 – $10,000 | $2,500 – $12,000 |
| Sewer/Septic Connection | $2,000 – $8,000 | $3,000 – $10,000 | $5,000 – $15,000 |
| TOTAL (Municipal Utilities) | $10,500 – $28,500 | $19,500 – $46,000 | $29,500 – $66,000 |
| TOTAL (Off-Grid Systems) | $25,000 – $45,000 | $40,000 – $70,000 | $55,000 – $95,000 |
📋 Code Compliance & Permit Requirements
All utility systems in container homes typically require permits and inspections per IBC 2021, NEC 2020, IPC 2021, and IMC 2021 requirements. Separate permits are usually required for plumbing, electrical, and mechanical systems, each with multiple inspection phases.
Required Permits & Inspections
- Plumbing Permit: Required for all water supply, drainage, and gas piping. Inspections: rough-in (before covering), final (after fixtures installed). Licensed plumber often required.
- Electrical Permit: Required for all electrical work including service, panels, wiring, and fixtures. Inspections: service (meter/panel), rough-in (wiring), final (devices installed). Licensed electrician typically required.
- Mechanical Permit: Required for HVAC equipment, ductwork, and ventilation systems. Inspections: rough-in (ductwork), final (equipment installed). Licensed HVAC contractor may be required.
- Well Permit: Required for private well installation. Includes soil testing, drilling permit, pump installation, water quality testing. Licensed well driller required.
- Septic Permit: Required for on-site wastewater treatment. Includes percolation testing, system design approval, installation inspection, final inspection. Licensed installer required.
Professional Licensing Requirements
Most jurisdictions require licensed professionals for utility installations in residential structures. We recommend verifying local requirements before beginning work to help ensure proper compliance with building codes and safety standards.
🔧 Professional Installation Tips & DIY Considerations
While some utility work can be performed by skilled DIYers in certain jurisdictions, most areas require licensed professionals for plumbing, electrical, and HVAC installations. Even where DIY work is permitted, hiring professionals helps ensure code compliance, proper installation, and warranty protection.
When to Consider Professional vs. DIY
We Recommend Always Hiring Licensed Professionals For:
- Electrical panel installation and service connections
- Gas line installation and connections
- HVAC equipment installation and refrigerant charging
- Well drilling and pump installation
- Septic system design and installation
- Any work requiring permits in your jurisdiction
Potential DIY Work (where permitted and if you have experience):
- Basic plumbing rough-in (with professional inspection)
- Fixture installation after professional rough-in
- Interior wiring (if experienced and properly permitted)
- Rainwater collection system setup
- Solar panel mounting (hire electrician for connections)
Container-Specific Installation Tips
- Plan Penetrations Carefully: Every hole through container walls weakens structure and creates potential leak point. Minimize penetrations and seal properly.
- Use Thermal Breaks: Install thermal break materials where metal contacts plumbing or electrical to help prevent heat loss and condensation.
- Protect Against Corrosion: Use dielectric unions where dissimilar metals meet. Apply rust-preventive coatings to exposed steel after cutting or drilling.
- Create Access Panels: Install removable access panels at utility connections for future maintenance and inspection.
- Document Everything: Photograph all rough-in work before covering. Create utility maps showing all line locations for future reference.
- Test Systems Thoroughly: Pressure test plumbing, load test electrical circuits, leak test HVAC before final inspection.
❓ Frequently Asked Questions About Container Home Utilities
We’re Here to Help You Plan Your Container Home Utilities
Thank you for taking the time to learn about container home utilities and systems. We understand that proper utility planning is essential for creating a safe, comfortable, and functional home, and we’re honored to support you on this journey.
Our permit-ready plans include comprehensive utility specifications with plumbing, electrical, and HVAC layouts designed by professionals with expertise in NEC 2020, IPC 2021, and IMC 2021 codes. Each plan provides detailed drawings, material lists, and specifications to help streamline your permitting process and guide professional installations.
We recommend working with a local Professional Engineer (PE) for final approval, as permitting requirements and utility regulations can vary by jurisdiction. Since building codes and local standards differ across the USA, PE involvement helps ensure your specific project meets all applicable requirements.
We also offer custom plan editing services after your purchase, so if you’d like to adjust utility layouts, system specifications, or configurations to better suit your needs and site conditions, we’re here to help at a reasonable additional cost.
We want to be transparent with you: our plans come as-is, with no warranty or money-back guarantee. We’ve worked hard to create high-quality, code-informed designs based on successful container home builds across America, but we cannot guarantee permit approval in every jurisdiction due to varying local requirements. This is why professional PE and licensed contractor involvement is important for your specific project.
We’re confident that our plans will give you a strong foundation for your utility planning, and we’re committed to providing helpful guidance along the way. If you have any questions before purchasing, please reach out—we’re happy to assist.
View Our Permit-Ready Plans →


[…] Result: This systematic approach satisfies ICC IRC requirements, eliminates thermal bridging, controls moisture, and achieves blower door test compliance in one integrated system. Learn more about complete container home systems integration. […]
[…] costs, energy efficiency through proper insulation installation, utility accessibility for plumbing and electrical systems, and overall project timeline. Choosing foundation options for container homes adapted to your […]
[…] smooth interior walls 2-4 inches inset from the container walls, creating utility chases for plumbing and electrical systems while providing flat surfaces for mounting fixtures and […]
[…] Utilities & Systems Installation […]