Container Home Insulation: The Ultimate 2025 Guide to Code-Compliant R-Values
Stop condensation, meet IRC energy codes, and ensure year-round comfort in your steel structure.
If there is one topic that keeps container home builders awake at night, it’s container home insulation. Get it right, and you have an incredibly energy-efficient, durable, and cozy home. Get it wrong, and you could be facing the infamous “container sweat”—a phenomenon where hidden condensation leads to mold, rust, and a failed building inspection. Unlike traditional wood-framed houses, shipping containers are massive thermal conductors. They transfer heat and cold with ruthless efficiency. This unique characteristic means that standard insulation approaches often won’t pass the International Residential Code (IRC) requirements, nor will they keep you comfortable.
In this comprehensive guide, we are going to demystify the complex world of R-values, thermal bridging, and vapor barriers specifically for steel structures. We will walk through the exact code requirements you need to know for 2025, compare the top insulation methods used by professionals, and show you how to achieve a permit-ready thermal envelope. Whether you are building in the freezing Rockies or the humid Florida coast, understanding these principles is non-negotiable for a legal, livable home.
The Physics of Steel: Understanding Thermal Bridging
Before we dive into R-values, we must understand why insulating a container is fundamentally different from insulating a stick-built home. A standard shipping container is made almost entirely of Corten steel. Steel is an exceptional conductor of heat—it’s roughly 400 times more conductive than wood.
This creates a massive problem known as thermal bridging. A thermal bridge is an area of a building that has significantly higher heat transfer than the surrounding materials. In a container home, the entire structure is a thermal bridge. In winter, heat from inside your home will race toward the cold steel walls and escape. In summer, the sun will bake the steel exterior, and that heat will radiate fiercely into your living space.
When warm, moist air inside your home touches a cold steel surface (in winter), it immediately reaches its dew point and turns into liquid water. If you simply stuff fiberglass batts against the steel wall, this condensation will happen behind your insulation, against the metal. You won’t see it until it’s too late—when mold starts growing through your drywall or the container wall rusts through from the inside out.
To prevent this, your container home insulation strategy must do two things simultaneously:
- Provide Thermal Resistance (R-Value): Slow down the movement of heat to meet energy codes.
- Create an Air and Vapor Seal: Prevent interior air from ever touching the cold steel surface.
This is why standard fiberglass batts, when used alone, are almost always a recipe for disaster in container builds. They permit air movement, leading to the condensation issues described above.
Decoding the IRC: 2025 R-Value Requirements
The International Residential Code (IRC), specifically Chapter 11 (Energy Efficiency), sets the standards for insulation. These standards are based on your specific geographic location, known as your Climate Zone. You can find your climate zone on the map provided by the International Code Council (ICC) or the Department of Energy.
Understanding “R-Value” and “Continuous Insulation (ci)”
R-value measures a material’s resistance to heat flow. The higher the R-value, the better it insulates. Code tables will often see two numbers, for example: “R-20 or R-13+5ci”.
- R-20 (Cavity Insulation): This typically refers to insulation between studs (like fiberglass batts in a wood wall).
- R-13+5ci (Cavity + Continuous): This means R-13 in the cavity plus R-5 of continuous insulation (ci). Continuous insulation runs uninterrupted over framing members (studs), breaking the thermal bridge.
For container homes, because steel studs (if you use them) and the container walls themselves are such severe thermal bridges, building officials often heavily favor or require continuous insulation strategies to meet energy codes. Simply building a 2×4 wood frame inside a container and filling it with R-13 batts often will NOT meet modern code in many colder climate zones because the steel container wall is still conducting heat around those studs if not properly isolated.
IRC Table N1102.1.3 (R402.1.3) Simplified for Containers
While you must check your local amendments, here is a general baseline of what the 2021/2024 IRC typically requires for wood-framed walls (which officials often apply as the baseline for containers, though sometimes they are stricter for steel).
| Climate Zone | Typical Location Example | Wood Frame Wall R-Value | Ceiling R-Value | Floor R-Value |
|---|---|---|---|---|
| 1 | Miami, FL (Hot/Humid) | R-13 or R-0+10ci | R-30 | R-13 |
| 2 | Houston, TX (Hot/Humid) | R-13 or R-0+10ci | R-38 | R-13 |
| 3 | Atlanta, GA (Mixed) | R-20 or R-13+5ci | R-38 | R-19 |
| 4 | New York City (Mixed/Cold) | R-20+5ci or R-0+15ci | R-49 | R-19 |
| 5 | Chicago, IL (Cold) | R-20+5ci or R-13+10ci | R-49 | R-30 |
| 6 | Minneapolis, MN (Cold) | R-20+5ci or R-13+10ci | R-49 | R-30 |
| 7 & 8 | Aspen, CO / Alaska (Very Cold) | R-20+5ci or R-13+10ci | R-60 | R-38 |
Note: “ci” stands for continuous insulation. Notice how from Zone 4 upwards, continuous insulation becomes almost mandatory in standard prescriptive paths. For container homes, achieving these values requires careful planning, often involving high-performance spray foam to save interior space.
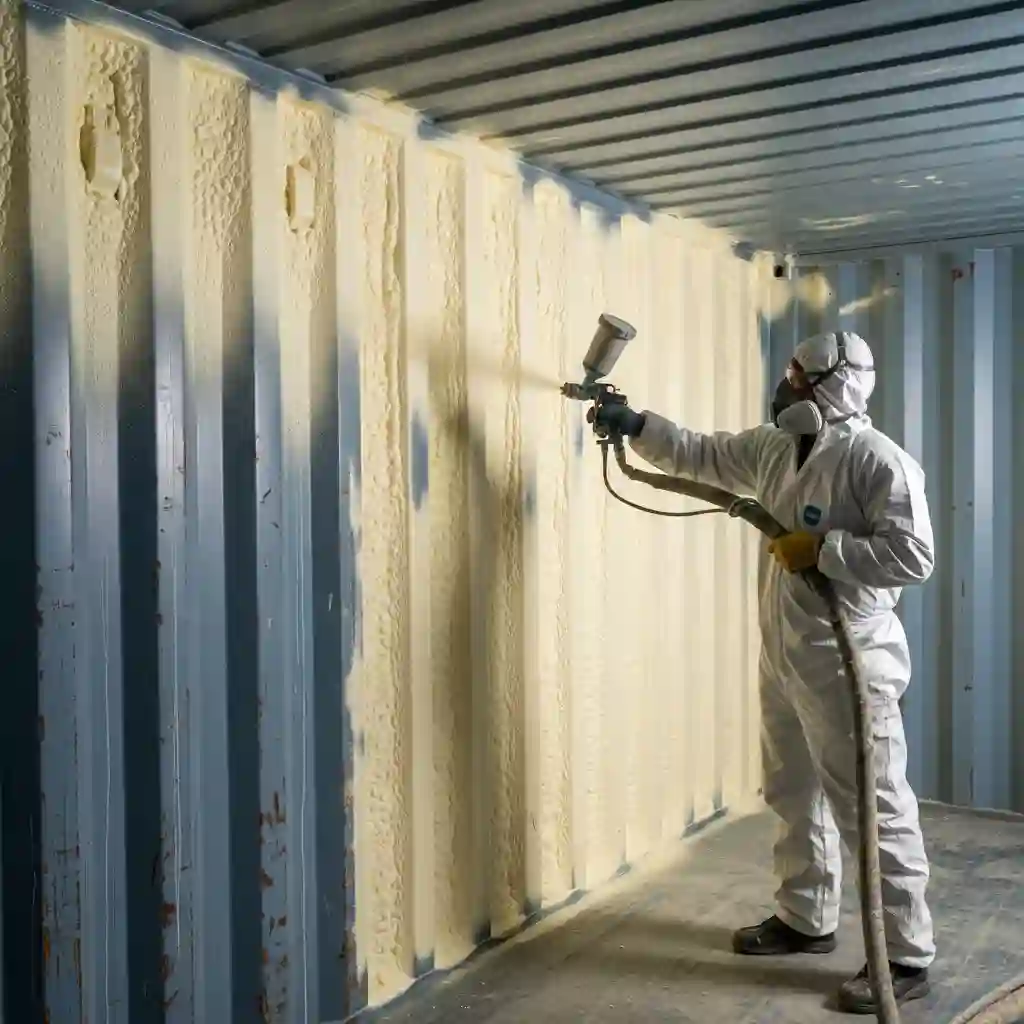
Method 1: The Gold Standard (Closed-Cell Spray Foam)
If you ask any experienced container home builder or building science expert what the best container home insulation is, the answer is almost universally Closed-Cell Spray Polyurethane Foam (ccSPF). While it is often the most expensive option, it solves multiple unique container challenges in one single application.
Why it works for containers:
- Highest R-Value per Inch: ccSPF typically offers R-6.5 to R-7 per inch. To achieve an R-20 wall, you only need about 3 inches of foam. This is critical in containers where interior width is limited (a standard container is only roughly 7’8″ wide inside).
- Built-in Vapor Barrier: At a thickness of 1.5 to 2 inches (depending on the specific product manufacturer), closed-cell foam becomes a Class II vapor retarder. It bonds directly to the steel, leaving no gap for air or moisture to touch the metal. This effectively eliminates the condensation risk mentioned earlier.
- Adds Structural Rigidity: While containers are already strong, ccSPF dries rigid, “gluing” everything together and reducing any potential “oil-canning” (flexing) of the metal walls.
- Air Barrier: It expands to fill every tiny nook, cranny, and screw hole, creating a perfect air seal that stops drafts and improves energy efficiency significantly.
🚧 Permitting Pro-Tip
When submitting plans using spray foam, your building official will likely ask for the ICC-ES evaluation report for the specific foam product you intend to use. This report proves the foam’s R-value, fire safety ratings, and vapor retarding qualities. Always ensure your contractor uses code-compliant foam and provides this documentation.
Method 2: Rigid Foam & Continuous Insulation (ci)
Another code-compliant method, often used for exterior insulation or by advanced DIYers, is using rigid foam boards (such as XPS – Extruded Polystyrene, or Polyiso – Polyisocyanurate). Polyiso boards can have excellent R-values, sometimes reaching R-6 per inch.
The Application Strategy
To use rigid boards effectively inside a container, they must be perfectly sealed. You cannot just wedge them between studs. The best practice is often to glue them directly to the steel container walls with a specialized adhesive, and then meticulously tape every single seam with high-quality flashing tape. You can then build your stud wall inside of this rigid foam layer.
This method effectively creates continuous insulation between the steel and your interior framing, breaking the thermal bridge. However, it is extremely labor-intensive to get a perfect air seal on the corrugated (wavy) walls of a container. Any small gap behind a rigid board can become a condensation pocket. For this reason, many builders prefer spray foam for the interior, and reserve rigid boards for exterior insulation if they plan to clad the outside of the container.
Method 3: The Hybrid “Flash-and-Batt” System
For builders on a tighter budget who still need to meet high R-value codes (like in cold climates such as Colorado), the “Flash-and-Batt” method is a popular compromise.
This involves applying a thin layer (usually 1.5 to 2 inches) of closed-cell spray foam directly to the container steel. This “flash” layer provides the critical air seal and vapor retarder, protecting the metal from condensation. Once that is cured, you can build a standard wood frame inside and fill the remainder of the cavity with less expensive insulation, such as mineral wool (Rockwool) or fiberglass batts, to reach your target total R-value.
Critical Warning for Hybrid Systems
You MUST ensure the initial spray foam layer is thick enough to prevent the inner surface of the foam from reaching the dew point. If that foam layer is too thin, moisture can still condense on it inside the wall cavity. The IRC has specific tables (R702.7.1) governing the ratio of foam-to-batt insulation required based on your climate zone to prevent this.
The Vapor Barrier Dilemma: Avoiding the “Sweat Box”
One of the most confusing aspects of container home insulation is vapor barriers. In traditional construction, you might see a plastic sheet (polyethylene) stapled to the warm side of the wall (behind the drywall in cold climates). In a container home, doing this can be disastrous.
Why? Because the steel container exterior is already a perfect vapor barrier. If you add another vapor barrier on the inside (like a plastic sheet behind the drywall), you have created a “double vapor barrier” assembly. Any moisture that inevitably gets into that wall cavity (from an electrical outlet, a tiny crack, or just diffusion) is now trapped forever. It cannot dry to the outside because of the steel, and it cannot dry to the inside because of the plastic. It will sit there and rot your studs or rust your container.
The Rule of Thumb: Generally, container assemblies should be designed to dry to the inside (except in very specific hot/humid climates where expert engineering is needed). This is why closed-cell foam is so effective—it acts as the vapor control layer right at the steel surface, stopping moisture before it enters the assembly, while leaving the interior stud cavity able to “breathe” back into the room if necessary.
Interior vs. Exterior: Fighting for Every Inch
Deciding where to put the insulation is a major design decision that affects your floor plan and your budget.
Interior Insulation
Pros: Maintains the classic “shipping container look” on the outside; easier to protect from weather during construction; no need for exterior cladding.
Cons: Reduces valuable interior living space. In a 40ft High Cube, 3 inches of spray foam and framing on each wall can reduce your interior width from ~7’8″ to roughly 7’2″ or less.
Exterior Insulation
Pros: Maximizes interior space; highly effective at eliminating thermal bridging because you wrap the entire metal box in a warm blanket.
Cons: Requires expensive exterior cladding (siding, stucco, etc.) to hide and protect the insulation; you lose the industrial container aesthetic; more complex to weatherproof details like windows and doors.
Most permit-ready plans, including those we offer at PermitContainerhomes.com, assume interior insulation for simplicity and cost-effectiveness, but they are carefully designed to ensure livable dimensions remain after code-compliant insulation is installed.
Floor and Roof: The Forgotten Surfaces
The Roof is Critical
Heat rises, and the summer sun beats down relentlessly on the metal roof. Roof insulation is often required to have much higher R-values (R-38 to R-60 depending on climate zone, as seen in the table above). Achieving R-60 inside a container ceiling would take nearly 10 inches of closed-cell foam, drastically reducing your ceiling height. For this reason, many container builds use exterior roof insulation. Builders often construct a traditional truss or shed roof over the container, allowing for ample space for blown-in cellulose or thick fiberglass batts above the actual container metal ceiling.
Don’t Forget the Floors
Container floors are typically made of marine-grade plywood over steel cross-members. They are uninsulated by default. In cold climates, this means freezing cold floors. The best way to insulate them is to spray closed-cell foam from underneath the container, between the steel cross-members. This seals out moisture from the ground, keeps critters out, and provides excellent R-value without raising your interior floor height.
Cost Analysis & Budgeting for Insulation
Insulation will likely be one of the larger line items in your budget, but it is an investment that pays off every single month in lower utility bills and keeps you compliant with energy codes.
- Closed-Cell Spray Foam: Professionally installed, this can range from $1.50 to $3.00+ per board foot (a board foot is 12″x12″x1″). For a 40ft container, you could easily spend $3,000 – $6,000+ depending on required thickness and local labor rates.
- DIY Spray Foam Kits: “Froth-paks” or similar two-part kits are available. While tempting, they are difficult to apply evenly for large areas, can be messy, and if mixed at the wrong temperature, may not cure properly, leading to off-gassing odors. For whole-home permit approval, professional installation with certified reports is often safer.
- Flash-and-Batt: Can save 20-30% compared to full spray foam, as mineral wool is significantly cheaper per R-value than additional inches of spray foam.
For more on how these costs fit into your overall budget, check out our guide on container home costs.
❓ Frequently Asked Questions
What is the minimum R-value for container home insulation?
There is no single “minimum” R-value for all container homes; it depends entirely on your local Climate Zone as defined by the IECC/IRC. Generally, walls need anywhere from R-13 in hot climates to R-30+ in very cold climates. Always check with your local building department for the specific energy code adopted in your area.
Can I use fiberglass insulation in a shipping container?
Using fiberglass batts alone directly against container walls is highly risky and often prohibited by savvy building officials due to condensation risks. Fiberglass does not stop air or moisture vapor. It can only be safely used in a container if combined with a reliable air and vapor barrier, such as in a “flash-and-batt” hybrid system where spray foam first seals the metal.
Is ceramic paint insulation enough for a container home?
No. While ceramic-additive paints can reflect some solar radiation (acting as a radiant barrier), they provide negligible R-value (often less than R-1 equivalent). They will absolutely NOT meet IRC energy code requirements for habitable dwelling wall or roof insulation.
Does spray foam insulation cause containers to rust?
Properly applied closed-cell spray foam actually prevents rust by sealing the metal off from both oxygen and moisture. However, if open-cell foam is used incorrectly directly against steel in a cold climate, moisture could potentially pass through it and condense on the metal, causing issues. This is why closed-cell is preferred for the layer touching the metal.
Start with a Warm, Code-Compliant Design
Don’t guess at your R-values. Our permit-ready container home plans are designed with modern energy codes in mind, ensuring you have the space and specifications needed for a comfortable, compliant build.
Browse Insulatable Floor PlansNeed to adjust insulation thickness for a specific extreme climate zone? We offer a professional plan modification service after purchase to adapt our designs to your local code requirements. Just contact us for a quote!
Important: Insulation requirements vary significantly by Climate Zone and local code amendments. The R-values provided here are based on general 2021 IRC tables and may not reflect the exact requirements of your specific jurisdiction. Always verify your insulation plan with a local Professional Engineer (PE) or your building department before construction.
Financial Disclaimer: Insulation costs can fluctuate based on petroleum prices (for spray foam) and local labor availability. Always get multiple quotes from licensed insulation contractors.
Refund Policy: Due to the digital nature of our plans, all sales are final. Please review our Refund Policy for details.