The Ultimate Container Home Insulation Guide: Code, Condensation & R-Values
Everything you need to know about insulating your container home for comfort and permit approval, from R-values to installation methods.
Welcome to the most critical decision you will make for your container home. More than the floor plan, the windows, or the cladding, your container home insulation strategy will determine your long-term comfort, energy bills, and the physical integrity of your home. A shipping container is, at its core, an uninsulated steel box. It is a brilliant conductor of heat, meaning it becomes an oven in the summer and an icebox in the winter. Getting the insulation right is not just a suggestion; it is the fundamental engineering challenge of this building method.
Failing to insulate properly doesn’t just lead to high energy bills. It leads to condensation, which leads to rust, mold, and the complete failure of interior finishes. This is not a step to cut corners on. The good news is that with a permit-ready plan and a solid understanding of building science, you can create a high-performance, exceptionally comfortable, and durable home. We are here to walk you through this process, from the code requirements to the pros and cons of each material, ensuring you do it right the first time.
Why Container Home Insulation is Your Most Critical Decision
Before we discuss materials, we must first understand the unique challenges a steel structure presents. Your container home is not a typical wood-frame house, and it cannot be insulated like one. The entire structure is made of metal, which creates two primary problems: thermal bridging and condensation.
The Steel Box Problem: Understanding Thermal Bridging
Thermal bridging is the movement of heat across an object that is more conductive than the materials around it. Think of a metal spoon left in a hot cup of coffee. The handle quickly becomes hot, right? The metal “bridges” the heat from the coffee to your hand.
In a container home, the entire steel shell—walls, roof, and floor—is one giant thermal bridge. If you only insulate between interior wood studs (like in a traditional house), the steel ribs of the container and the studs themselves will still be in contact with the outside temperature. This means that on a cold day, every steel rib will be freezing cold, bypassing your insulation and transferring that cold directly to your interior drywall. This is called a “thermal short-circuit.”
This bridging effect dramatically lowers your home’s effective R-value and creates cold spots on your interior walls. These cold spots are where our second, more dangerous, problem begins: condensation.
The Silent Killer: Condensation Explained
Condensation occurs when warm, moist air (like the air inside your heated home) comes into contact with a cold surface. The air cools rapidly at that spot, and since cold air cannot hold as much moisture as warm air, it releases the excess water onto the cold surface. You see this every day on the outside of a cold glass of water.
How Condensation Forms in a Container Home
In a poorly insulated container home, this process happens inside your walls. The warm, moist air from your breathing, cooking, and showering finds its way through microscopic gaps in your drywall and insulation. It then hits the freezing cold steel shell of the container. The result is instant, massive condensation—liquid water—forming on the inside of the steel. Because it’s trapped behind your walls, it has nowhere to go. It soaks your insulation (rendering it useless), rots your wood studs, and creates a perfect, hidden breeding ground for toxic mold.
The Risks of Unchecked Condensation
- Rust: The number one enemy of a shipping container. Condensation from the inside will rust your home from the inside out, compromising its structural integrity.
- Mold and Mildew: Trapped moisture in wall cavities is a recipe for mold, which can cause serious health problems and is incredibly difficult to remediate.
- Insulation Failure: Batt insulation (like fiberglass) completely loses its R-value when it gets wet. It becomes a damp, heavy mat.
- Structural Rot: If you use wood framing, the constant moisture will rot your studs, leading to structural failure.
The Solution: The solution to both thermal bridging and condensation is twofold: 1. Continuous Insulation (ci): You must create an unbroken thermal envelope around the entire structure. This is most effectively done with exterior insulation or interior spray foam. 2. Air & Vapor Control: You must stop warm, moist interior air from ever touching the cold steel shell. This requires a perfectly sealed air barrier and vapor retarder.
The “Skin” of Your Home: Interior vs. Exterior Insulation
You have three primary strategies for placing your unbroken thermal barrier.
The Case for Exterior (Continuous) Insulation
This is the most effective method from a building science perspective. You wrap the outside of the container in a thick, continuous blanket of rigid foam or spray foam. This completely stops thermal bridging and moves the “dew point” (the surface where condensation could happen) to the outside of the steel. The entire steel mass of your container is now inside your heated/cooled space, where it can act as a “thermal battery,” helping to stabilize your interior temperature.
- Pros: Best thermal performance, eliminates all thermal bridges, stops condensation, and saves all 8 feet of interior width.
- Cons: More complex and costly, as you must build a secondary exterior frame to hold the insulation and your final cladding (siding).
The Case for Interior Insulation
This is the most common method. You insulate from the inside. However, you cannot just fill 2×4 stud bays and call it a day. To be effective, you must use an insulation that creates a continuous, air-tight, and vapor-tight barrier directly against the steel wall. The only material that reliably does this from the inside is closed-cell spray foam. It adheres directly to the corrugated steel, sealing every gap and creating a monolithic vapor barrier, completely isolating the interior air from the exterior steel.
- Pros: Generally less expensive and simpler than exterior. The container’s original steel exterior is preserved.
- Cons: You lose valuable interior space (typically 3-4 inches per wall). You must still build an interior 2×4 wall to hold utilities and drywall.
The Hybrid Approach
This involves a combination, such as using spray foam on the inside and adding rigid foam on the outside. While technically possible, it’s often overly complex and costly. The “sweet spot” for most builders is a well-executed interior closed-cell spray foam application.
Decoding the Building Code: R-Values and Your Container Home
Now that you understand the why, let’s talk about the what. Your local building department doesn’t just want you to be comfortable; they have legal requirements for energy efficiency. These are dictated by the International Residential Code (IRC), which is the base model code used by most jurisdictions in the United States. We use the IRC and container home building codes as the foundation for all our permit-ready plans.
What is an R-Value? (And a U-Factor?)
Understanding these two terms is essential for speaking the same language as your building inspector.
R-Value Explained Simply
R-Value measures an insulation’s resistance to heat flow. The “R” stands for “resistance.” A higher R-value means better insulation. A standard 2×4 fiberglass batt has an R-value of about R-13. A 3-inch layer of closed-cell spray foam can be R-21.
U-Factor vs. R-Value
U-Factor (or U-Value) is the inverse of R-value. It measures how much heat passes through a material or a whole assembly (like a wall). A lower U-factor is better. Windows and doors are almost always measured by their U-factor. Your wall assembly (studs, insulation, drywall) will have a total U-factor. For permitting, you will often need to show that your R-value is above a minimum, or your U-factor is below a maximum.
For more foundational information on R-values, the US Department of Energy’s guide to insulation is an excellent, high-authority resource.
Your Legal Requirement: The International Residential Code (IRC)
Your specific R-value requirement is not a single number. It depends entirely on where you live. The IRC divides the entire United States into eight “Climate Zones” based on average temperatures.
Finding Your Climate Zone
Your first step is to find your climate zone. A simple way to do this is by checking the ENERGY STAR Climate Zone map. A home in Climate Zone 1 (South Florida) will have very different requirements than a home in Climate Zone 7 (Northern Minnesota).
Code Requirements for `Container Home Insulation`
Chapter 11 of the 2021 International Residential Code (IRC) provides the prescriptive path for energy compliance. Table N1102.1.3 is the “cheat sheet” for these requirements. It tells you the minimum R-value you must have in your ceiling, walls, floor, and foundation.
Because of the thermal bridging problem, you must pay attention to the “Continuous Insulation (ci)” requirement. For container homes, using the “ci” value is the most accurate way to meet the intent of the code.
A Practical Table: Prescriptive R-Values by 2021 IRC Climate Zone
We’ve simplified the code table to show the most common requirements. Our permit-ready plans perform these calculations for you and present the required R-values directly on the plans your inspector needs to see.
| Climate Zone | Ceiling R-Value | Wood Frame Wall R-Value | Floor R-Value | Basement Wall R-Value | Slab R-Value & Depth |
|---|---|---|---|---|---|
| Zone 1 | R-30 | R-13 | R-13 | 0 | 0 |
| Zone 2 | R-49 | R-13 | R-13 | 0 | 0 |
| Zone 3 | R-49 | R-20 or R-13+R-5ci | R-19 | R-5ci or R-13 | R-10, 2ft |
| Zone 4 (Except Marine) | R-60 | R-20+R-5ci or R-13+R-10ci | R-19 | R-10ci or R-13 | R-10, 4ft |
| Zone 5 & Marine 4 | R-60 | R-20+R-5ci or R-13+R-10ci | R-30 | R-15ci or R-19 or R-13+R-5ci | R-10, 4ft |
| Zone 6 | R-60 | R-20+R-5ci or R-13+R-10ci | R-30 | R-15ci or R-19 or R-13+R-5ci | R-10, 4ft |
| Zones 7 & 8 | R-60 | R-20+R-5ci or R-13+R-10ci | R-38 | R-15ci or R-19 or R-13+R-5ci | R-10, 4ft |
Source: Based on 2021 IRC, Table N1102.1.3. “ci” means “continuous insulation.” “R-13+R-5ci” means R-13 cavity insulation plus R-5 continuous insulation.
For a container home, you should focus on the “ci” (continuous insulation) values or use a method (like spray foam) that creates a monolithic barrier and provides an equivalent total R-value. Simply putting R-20 batts in a stud wall will not perform like an R-20 wall due to thermal bridging.
The Top 5 Types of `Container Home Insulation` (Pros, Cons & R-Value)
This is where the rubber meets the road. Choosing your material will impact your budget, installation timeline, and interior space. Here are the top contenders, analyzed for container home suitability.
Option 1: Spray Foam Insulation (The Gold Standard)
This is the most popular and, in many ways, best solution for container homes. It’s a liquid foam that is sprayed onto a surface and expands, curing into a rigid, solid layer of insulation.
Closed-Cell Spray Polyurethane Foam (ccSPF)
This is the specific type we (and most experts) recommend. It is a dense, rigid foam that is packed with a special gas, giving it an incredible R-value.
- Typical R-Value: R-6.5 to R-7 per inch.
Pros
- Highest R-Value: You get the most insulation in the least amount of space. 3 inches of ccSPF (R-21) will meet wall code in many zones.
- Air Barrier: It is “air-impermeable”, sealing every tiny crack and stopping air leaks.
- Vapor Retarder: It is a Class II vapor retarder, stopping moisture from ever reaching the steel wall. It is an all-in-one solution for air, vapor, and thermal control.
- Structural Rigidity: It adds racking strength to the wall assembly.
Cons
- Cost: It is the most expensive option.
- Professional Install: It is not a DIY job. It requires a professional crew with specialized equipment and safety gear.
- Off-Gassing: It can release volatile organic compounds (VOCs) during and shortly after installation. You must vacate the premises during this curing period.
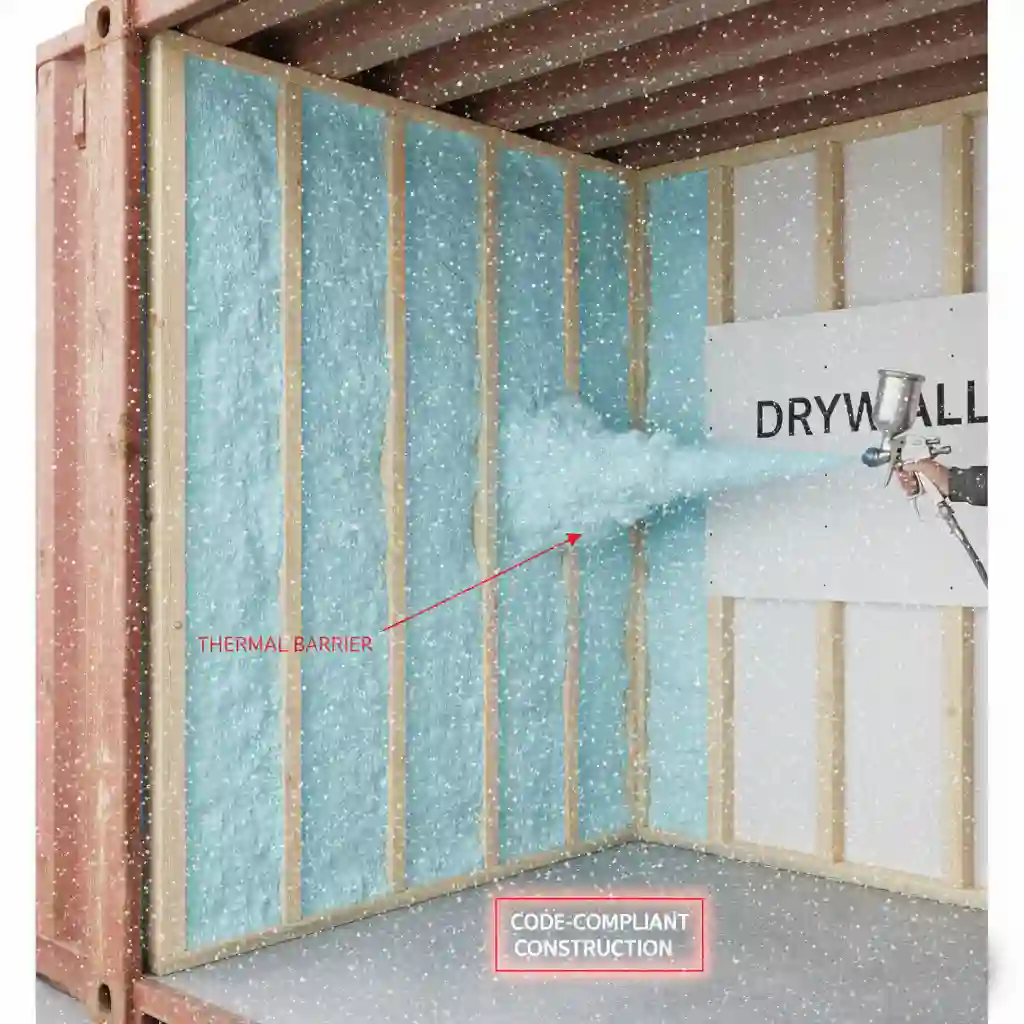
You cannot leave spray foam exposed on the interior of your home. The IRC (Section R316.4) mandates that all foam plastic insulation be separated from the interior living space by an approved thermal barrier. This is a critical fire-safety requirement.
Approved thermal barriers include:
- A minimum of 1/2-inch (12.7 mm) gypsum wallboard (drywall).
- A minimum of 23/32-inch (18.3 mm) wood structural panel (plywood/OSB).
- Other approved materials.
This is why all our plans show an interior 2×4 stud wall built inside the spray foam layer. This wall provides the cavity for utilities (electrical, plumbing) and a surface to which you can easily attach your required drywall thermal barrier.
Open-Cell Spray Polyurethane Foam (ocSPF)
This is a lighter, spongier, and cheaper version of spray foam.
- Typical R-Value: R-3.5 to R-4 per inch.
We do not recommend open-cell foam for container homes. While it is a good air barrier, it is vapor-permeable. This means moisture-laden air can pass through it, condense on the cold steel, and get trapped between the foam and the wall, leading to rust. It requires a separate, perfectly installed vapor barrier, which defeats the all-in-one advantage of spray foam.
Option 2: Rigid Foam Boards (The High-Performance DIY)
These are large, rigid panels of foam that are cut to fit and attached to the container walls (either inside or out). They must be combined with a separate interior stud wall.
- Polyisocyanurate (“Polyiso”): Highest R-value (R-6.5 per inch), often foil-faced, which can act as a radiant barrier. It is the best-in-class for rigid boards.
- Extruded Polystyrene (XPS): The pink or blue boards. Good R-value (R-5 per inch) and high moisture resistance.
- Expanded Polystyrene (EPS): The white, beaded foam (like a coffee cup). Good R-value (R-3.8 per inch) and the lowest cost, but also the most vapor-permeable of the three.
Pros
- High R-Value: Offers excellent performance, especially Polyiso.
- DIY-Friendly: Can be installed by a skilled DIYer with a utility knife, foam board adhesive, and high-quality seam tape.
- Continuous Insulation: Can be installed as a continuous layer, breaking the thermal bridges (especially on the exterior).
Cons
- Sealing is Critical: Every single seam, joint, and edge must be meticulously sealed with code-approved tape or canned foam. A 1% air gap can lead to a 30% reduction in thermal performance and cause condensation.
- Vapor Barrier: You must install a separate, detailed vapor retarder (like 6-mil poly sheeting) on the warm-in-winter side.
- Thermal Barrier Required: Just like spray foam, all foam boards must be covered by a thermal barrier (drywall) per IRC Section R316.4.
Option 3: Insulation Panels (SIPs & “In-So-Fast”)
These are pre-manufactured, engineered panels that combine insulation and framing into one product.
- Structural Insulated Panels (SIPs): A layer of rigid foam (EPS or Polyiso) sandwiched between two layers of OSB. These are incredibly strong and insulative. They are typically used to create the entire wall and roof, often replacing the container walls themselves.
- Engineered Insulation Panels (like In-So-Fast): These are interlocking panels of rigid foam (usually EPS) with built-in plastic or metal studs. They are designed to attach directly to the container wall and provide a ready-made surface for drywall.
Pros
- Fast Installation: Combines studs and insulation in one step, dramatically speeding up the build.
- Good Performance: Provides continuous insulation with interlocking edges that minimize gaps.
Cons
- Cost: Can be more expensive than spray foam or foam boards.
- Vapor Barrier: You may still need a separate vapor barrier depending on the product and climate.
- Custom Fitting: Still requires significant cutting and sealing around openings and end walls.
Option 4: Batt and Roll Insulation (Fiberglass, Mineral Wool, Denim)
This is the traditional “fluffy” insulation you see in wood-frame houses. It is placed inside a 2×4 stud wall built on the interior of the container. This method is highly susceptible to condensation if not done with extreme care.
If you choose this path, you must pair it with a layer of continuous insulation (like 1-2 inches of rigid foam) on the exterior to keep the container shell warm. Alternatively, you must apply 1-2 inches of closed-cell spray foam first to act as a vapor barrier, then fill the rest of the stud bay with batt insulation (a “flash and batt” system).
Pros
- Affordable: This is the cheapest insulation material available.
- DIY-Friendly: Very easy to install (cut and place).
- Mineral Wool: Has excellent fire-resistant and sound-dampening properties.
Cons
- HIGH CONDENSATION RISK: Air moves freely through batt insulation. Interior air will hit the cold steel and condense, leading to mold and rust.
- Lower R-Value per Inch: R-3.5 (fiberglass) to R-4.2 (mineral wool). You need very thick walls (e.g., 2×6) to meet code in colder climates.
- Requires Framing: Does not provide its own structure.
Option 5: Eco-Friendly & Alternative Methods
For those looking for a greener build, these options are gaining popularity. They typically replace batt insulation inside a stud wall and have the same condensation risks.
- Sheep’s Wool: Excellent R-value (R-3.5 to R-3.8 per inch) and is naturally mold-resistant and can manage humidity by absorbing and releasing moisture.
- Cork: Can be applied in rigid boards or as a spray. Good R-value (R-3.6 to R-4.2 per inch), excellent soundproofer, and is vapor-permeable. Best used as an exterior continuous layer.
- Denim (Recycled Cotton): R-value around R-3.5 per inch. A good eco-friendly batt option, but must be paired with a perfect vapor barrier.
Comparison: Which Insulation is Best for Your Build?
Choosing the right `container home insulation` is a balance of R-value, budget, interior space, and your willingness to DIY. Here is a comprehensive table to help you compare your options.
At-a-Glance: `Container Home Insulation` Comparison Table
| Insulation Type | Avg. R-Value (per inch) | Approx. Cost ($/sq ft) | DIY-Friendly? | Air Barrier? | Vapor Retarder? | Pros | Cons |
|---|---|---|---|---|---|---|---|
| Closed-Cell Spray Foam (ccSPF) | R-6.5 – R-7.0 | $2.00 – $4.00 (per inch) | No (Pro install) | Yes (Excellent) | Yes (Class II) | All-in-one solution, high R-value, seals all gaps, adds rigidity. | Most expensive, requires pros, needs thermal barrier. |
| Open-Cell Spray Foam (ocSPF) | R-3.5 – R-4.0 | $1.00 – $2.00 (per inch) | No (Pro install) | Yes (Good) | No (Permeable) | Cheaper spray foam, good air seal. | NOT for containers. Allows vapor to pass, risking condensation. |
| Rigid Board (Polyiso) | R-6.0 – R-6.8 | $1.50 – $2.50 | Yes (Skilled) | Only if taped | Yes (Foil-faced) | High R-value, DIY, good for exterior continuous. | Seams are a major failure point, needs thermal barrier. |
| Rigid Board (XPS) | R-5.0 | $1.00 – $2.00 | Yes (Skilled) | Only if taped | Yes (Class II/III) | Good moisture resistance, DIY. | Seams are a major failure point, needs thermal barrier. |
| Rigid Board (EPS) | R-3.8 – R-4.2 | $0.75 – $1.50 | Yes (Skilled) | Only if taped | No (Permeable) | Lowest cost board, DIY. | Permeable, needs separate vapor barrier, needs thermal barrier. |
| Fiberglass Batt | R-3.1 – R-3.7 | $0.50 – $1.00 | Yes (Easy) | No | No (Kraft-faced is Class II) | Very cheap, easy to find and install. | High mold/rust risk, loses R-value when wet, air-permeable. |
| Mineral Wool Batt | R-3.7 – R-4.2 | $1.00 – $1.75 | Yes (Easy) | No | No | Fire-resistant, sound-dampening, moisture-resistant. | Still air-permeable, risks condensation, lower R-value. |
| Sheep’s Wool Batt | R-3.5 – R-3.8 | $2.00 – $3.50 | Yes (Easy) | No | No (Manages moisture) | Eco-friendly, manages humidity, mold-resistant. | Expensive, air-permeable, still needs air/vapor control. |
Best for Hot Climates (Zones 1-3)
In a hot climate, your main goal is stopping radiant heat gain. A combination of exterior continuous insulation (to stop the steel from ever getting hot) and a radiant barrier is ideal. If insulating from the inside, 2-3 inches of closed-cell spray foam (R-13 to R-21) is typically more than sufficient to meet code and keep the cool air in.
Best for Cold Climates (Zones 4-8)
This is where R-value is king. You need to meet the high R-values of the IRC. Your best and most space-efficient solution is closed-cell spray foam. To meet an R-49 ceiling requirement, you’ll need 7-8 inches. For an R-20+R-5ci wall, you’ll need at least 4-5 inches of ccSPF. The cost is high, but the performance is unmatched. An exterior continuous insulation wrap is also an excellent, but costly, alternative.
Best `Container Home Insulation` for DIY Builders
If you are committed to a DIY build, rigid foam boards are your best bet. You must be meticulous about sealing every single joint with high-quality tape and/or canned spray foam. You will also be responsible for correctly installing a Class I or II vapor barrier on the warm side of the wall. This is a complex assembly that requires careful attention to detail.
Best for Maximum Interior Space
Exterior continuous insulation is the clear winner. You lose zero interior space. The runner-up is closed-cell spray foam, which gives you the highest R-value per inch, saving you precious inches compared to batt or rigid foam solutions.
How to Install Insulation: A Step-by-Step Framing Guide
The “how” is just as important as the “what.” A perfect material installed incorrectly will fail. Our plans provide detailed wall assemblies, but here is the general process for the two best methods.
Exterior (Continuous) Insulation Installation Guide
This method wraps the container like a winter coat, keeping the steel warm and dry.
- Prep the Container: Ensure the container is clean, dry, and any rust spots are treated and painted.
- Attach Furring Strips: Mechanically attach vertical (or horizontal) “furring” (e.g., 2x4s on their flat, or metal Z-girts) to the container. This will create the frame to hold the cladding and a space for the insulation. This must be engineered to handle the weight of your siding.
- Install Rigid Foam Boards: Cut and fit rigid foam boards (Polyiso or XPS) tightly between and/or over the furring strips. Use multiple, offset layers to prevent gaps.
- Tape the Seams: This is the most important step. Use a high-performance building tape (not duct tape) to seal every single seam of the foam boards, creating a continuous air and water barrier.
- Install the Weather-Resistive Barrier (WRB): Over the foam/furring, install a WRB (like house wrap) in shingle-fashion, per IRC requirements.
- Attach Cladding: Fasten your final siding (wood, metal, etc.) to the furring strips, creating a rainscreen gap if possible.
Interior Insulation Installation Guide (Using Spray Foam)
This is the most common method for its balance of cost, performance, and simplicity.
- Prep the Container: The container interior must be perfectly clean, dry, and free of any rust or flaky paint. The foam needs a clean surface to adhere to.
- Frame Your Interior Walls: Build your 2×4 (or 2×2) stud walls. Set them back from the corrugated container wall (e.g., 1/2-inch gap) to allow the foam to get behind them. This “non-contact” method is crucial for stopping thermal bridging through the studs.
- Run Utilities (Stub-Outs): Run electrical conduit and plumbing pipes. Since they will be permanently encased in foam, they must be protected and placed perfectly. Many builders run utilities inside the stud wall after the foam is applied.
If you love one of our designs but need to move an electrical outlet or a plumbing stack, we offer a plan modification service after purchase. Just contact us for a quote, and we can help you customize the layout before your build begins!
- Apply Spray Foam (Professional): The professional crew will spray 2-4 inches of closed-cell spray foam directly onto the interior steel walls, roof, and floor. The foam expands to fill the corrugations and seals the gap behind your studs, creating one solid, monolithic barrier.
- The Vapor Retarder (Code Check): With closed-cell spray foam, you are already covered. At 2-3 inches, ccSPF acts as a Class II vapor retarder, which is exactly what you need. You do not need to add an extra plastic sheet.
- Install the Ignition/Thermal Barrier: This is the mandatory final step. Attach your 1/2-inch drywall (gypsum board) to the interior studs, per IRC Section R316.4. This covers the foam for fire safety and gives you your finished wall.
A Note on Vapor Retarders (If Using Batts/Rigid Foam)
If you don’t use ccSPF, you MUST install a vapor retarder. The IRC defines them by “perm” (permeability) class:
- Class I (Vapor Barrier): < 0.1 perm (e.g., 6-mil polyethylene sheet, foil-faced foam). Stops all vapor.
- Class II (Vapor Retarder): 0.1 to 1.0 perm (e.g., Kraft-faced batt, closed-cell spray foam).
- Class III (Vapor Retarder): 1.0 to 10 perm (e.g., latex paint).
Rule of Thumb: In Cold Climates (Zones 4-8), you MUST install a Class I or II vapor retarder on the warm-in-winter side (the interior side) of your insulation. In Hot-Humid Climates (Zones 1-3), the rules are different, and you often want a vapor-permeable assembly. This is why ccSPF (a Class II retarder) is a safe bet in most mixed climates.
Don’t Forget These! Overlooked Insulation Areas
New builders focus on the walls and forget that heat moves in all directions. The floor and roof are massive sources of heat loss and gain.
Insulating the Container Home Floor
The original 1.1-inch marine-grade plywood floor of a container has an R-value of about R-1. It is not enough. You have two main options:
- Spray Foam (Underneath): The best method. You lift the container onto a foundation (piers or blocks) and have a professional spray 2-4 inches of closed-cell spray foam onto the entire underside of the container. This completely seals it, protects it from moisture and pests, and provides excellent insulation without losing any interior headroom.
- Rigid Foam (Inside): The DIY/Slab method. You lay 1-2 inches of high-density rigid foam (XPS or Polyiso) directly on top of the container’s plywood floor, tape the seams, and then build a “floating” subfloor (e.g., two layers of 1/2-inch plywood) on top of it. You then install your final flooring (laminate, tile, etc.) on that. The downside is that you lose 2-3 inches of precious ceiling height.
Insulating the Container Home Roof
The roof is your biggest source of heat gain in the summer. How you insulate it depends on your roof design: a “container top” or a “pitched roof.”
The Vented vs. Unvented Roof Assembly
If you build a traditional pitched truss roof over your container, you create an attic. The IRC has long required these attics to be “vented” (with soffit and ridge vents) to flush out hot air and moisture. However, this is changing.
An Unvented Attic Assembly (or “hot roof”) is now permitted by the IRC (Section R806.5) if you use air-impermeable insulation (like spray foam) applied directly to the underside of the roof deck. This is the perfect solution for container homes.
Method 1 (Container Top): Spray 4-8 inches of closed-cell spray foam (meeting your climate zone’s R-value) directly onto the interior ceiling of the container. This seals the roof, and you simply cover it with drywall. No venting needed.
Method 2 (Pitched Roof): Build your pitched roof, but instead of venting it, have the foam contractor spray 4-8 inches of ccSPF directly to the underside of the new roof sheathing. This seals the entire attic space, making it part of your home’s thermal envelope. This is an incredibly efficient and simple method that eliminates the complexities of attic venting.
Fire Safety & Code Compliance for Foam Plastics
Your building inspector’s primary concern with foam insulation is fire safety. Foam plastic is combustible. You must follow the code’s rules for fire-stopping and thermal barriers. This is a non-negotiable life-safety requirement, and all our plans detail these connections.
Understanding Fireblocking vs. Draftstopping
In a wood-frame assembly, there are many concealed spaces (inside walls, between floors) where fire can spread rapidly and undetected. The IRC requires you to block these paths.
- Fireblocking (IRC R302.11): This is required in stud walls and partitions at the ceiling and floor levels, and at 10-foot horizontal intervals. Its job is to block vertical and horizontal flame spread within a wall cavity. When you use spray foam, the foam itself does not count as a fireblock unless it has been specifically tested for that purpose. You must still install fireblocks using approved materials (like 2x nominal lumber, 1/2-inch gypsum, etc.).
- Draftstopping (IRC R302.12): This is required in large, concealed floor/ceiling spaces to divide them into smaller areas (less than 1,000 sq ft) to prevent fire from spreading across an entire floor assembly.
The Ignition & Thermal Barrier Mandate (IRC R316)
This is the most important fire safety rule for foam. As we mentioned earlier, you cannot leave foam exposed.
- Thermal Barrier (IRC R316.4): Required for foam in habitable spaces. This is a heavy-duty barrier designed to keep the foam from heating up for a set period (e.g., 15 minutes) during a fire. The most common thermal barrier is 1/2-inch gypsum board (drywall).
- Ignition Barrier (IRC R316.5.3 & R316.5.4): Required for foam in spaces like attics or crawl spaces that are not habitable but are used for storage or utilities. This is a lighter-duty barrier simply meant to prevent the foam from being ignited by a stray spark. Approved ignition barriers include 1/4-inch wood structural panels (plywood) or 3/8-inch gypsum board.
Failure to install these barriers is a major code violation and a serious fire hazard. Our plans specify the correct barrier for every location, ensuring your project is safe and compliant.
Conclusion: The Permit-Ready Plan Advantage
As you can see, container home insulation is a complex topic that sits at the intersection of building science, fire safety, and energy codes. It’s not as simple as picking an R-value. You must account for thermal bridging, air sealing, vapor control, and fire barriers.
This is precisely why starting with a “permit-ready” plan set is so valuable. Instead of guessing, you are starting with a proven, code-compliant assembly.
How Our Plans Solve Your Insulation Nightmare
- We Specify Code-Compliant R-Values: Our plans don’t just give you a floor plan. They include the required R-values for your ceiling, walls, and floor, all based on the 2021 IRC.
- We Provide the Assembly Details: We provide detailed wall, roof, and floor assembly cross-sections. These show your builder (and your inspector) the exact layering of materials—from the steel, to the foam, to the stud wall, to the thermal barrier, and the final finishes.
- We Ensure Safety: Our plans include the required fireblocking and thermal/ignition barrier details, ensuring your home is not just comfortable, but safe for your family.
Choosing to build a container home is an exciting journey. By tackling the insulation challenge with the right knowledge and a professional plan, you are not just building a house—you are building a high-performance, efficient, and durable home that will last for decades. We are here to help you get it right.
❓ Frequently Asked Questions
What is the best R-value for a container home?
There is no single “best” R-value. The R-value you need is dictated by your local building code, which is based on your Climate Zone (per the IRC). For example, a wall in Florida (Zone 1) may only require R-13, while a wall in Minnesota (Zone 7) will require R-20 in the cavity plus R-5 of continuous insulation (ci). Always check your local code, or use a plan set that specifies this for you.
Can I over-insulate my container home?
Financially, yes. From a building science perspective, not really. There are diminishing returns. The jump from R-0 to R-20 is massive. The jump from R-40 to R-60 is much smaller. The most important thing is creating a continuous and air-tight envelope. A “leaky” R-40 wall will perform worse than an “air-tight” R-25 wall. Focus on quality of installation, not just thickness.
How much does container home insulation cost?
This is a major part of your budget. For a 40ft container (approx. 1,000 sq ft of surface area), a professional closed-cell spray foam (ccSPF) application at 3 inches (R-21) can cost between $6,000 and $12,000. A DIY rigid foam board (XPS) application at 3 inches (R-15) might cost $3,000 – $5,000 in materials (boards, adhesive, tape, plus your interior framing and drywall). You can use our cost estimator to get a rough idea for your project.
What’s the cheapest way to insulate a container home? (And why it’s risky)
The cheapest method is to build an interior 2×4 stud wall and fill it with fiberglass batt insulation. This is also the riskiest method. Fiberglass is air-permeable. It does nothing to stop warm, moist interior air from hitting the cold steel shell, which will cause massive condensation, mold, and rust. We strongly advise against this method unless it is part of a “flash and batt” system (1-2″ of ccSPF first) or paired with exterior continuous insulation.
Do I need a vapor barrier with closed-cell spray foam?
No. This is one of its greatest advantages. At a thickness of 2-3 inches, closed-cell spray foam (ccSPF) acts as its own Class II vapor retarder (per IRC definitions). It creates a monolithic barrier to both air and vapor, which is why it’s the gold standard for preventing condensation in container homes.
How do I insulate a container home for a cold climate?
In cold climates (Zones 5-8), you need high R-values (R-49 to R-60 for ceilings, R-20+R-5ci for walls). You must also have a robust air and vapor barrier on the interior (warm) side. Your best options are: 1) A thick layer of interior closed-cell spray foam (4-6 inches in walls, 7-8 inches in roof). 2) A thick layer of exterior continuous insulation (4-6 inches of Polyiso/XPS) with a well-sealed interior vapor barrier.
How do I insulate a container home for a hot climate?
In hot climates (Zones 1-3), your goal is to stop radiant heat gain. A light-colored roof is your first step. For insulation, exterior continuous insulation is highly effective as it stops the steel from ever heating up. If insulating from the inside, 2-3 inches of closed-cell spray foam (R-13 to R-21) is typically sufficient to meet code and stop the heat from transferring to the interior air.
What is the best `container home insulation` for DIY?
The most DIY-friendly high-performance option is rigid foam board (Polyiso or XPS). You can cut it with knives and glue/fasten it to the container. However, you must be extremely diligent in sealing 100% of the seams with high-performance tape and canned foam. You must also install a separate interior stud wall, run utilities, and install a vapor barrier and thermal barrier (drywall). It’s a complex, multi-step process that must be done perfectly.
Will insulation stop my container from rusting?
The right insulation will. Closed-cell spray foam, installed correctly, stops the warm, moist interior air from ever touching the cold steel. By stopping this condensation, you eliminate the primary cause of interior-out rust. Poor insulation (like fiberglass batts) will trap moisture against the steel, which will dramatically accelerate rust and destroy your home.
How do I insulate the original container doors?
If you plan to keep the original cargo doors functional, it’s very difficult. The best method is to weld a steel frame to the inside of the doors and have 2-3 inches of spray foam applied, then cover it with a metal or wood panel. For most people who keep the doors, they are sealed shut and an interior stud wall is built 3-4 inches inside them, which is then insulated just like the other walls. This provides the best seal and thermal performance.
Ready to Start Your Build?
Don’t let insulation and building codes stop your dream. Our permit-ready container home plans include detailed, code-compliant insulation schedules and wall assemblies specific to your project.
Browse All PlansIf you love a design but need to meet a specific R-value for your climate, we offer a plan modification service after purchase to help you customize it. Just contact us for a quote!
Important: Our plans are permit-ready but require review and stamping by a local licensed Professional Engineer (PE) in your jurisdiction. Final approval is subject to local building codes and regulations. We recommend consulting your local building department to verify all requirements.
Financial Disclaimer: Costs vary significantly by location, site conditions, and material choices. These are estimates for planning purposes only.
Refund Policy: Due to the digital nature of our plans, all sales are final. Please review our Refund Policy for details.